Setting Up Cura
In this tutorial we will take you through the steps of setting up your Cura Profile. This is a very simple process that will go quickly in order to get you on your way to printing!
Step 1 - Adding A New Machine
Start by clicking the "Machine" tab, followed by clicking on "Add New Machine"

Step 2 - Select Your Machine
Next, we want to select the "Other" button and click next. You can uncheck the option to submit anonymous information if you would like.

Step 3 - Other Machine Information
Here, we want to select "Custom" at the bottom and click Next to continue.

Step 4 - Custom Printer Information
Here we can name our machine. In this case, we are setting up a Griffin Pro XL. You will want to change all of the settings that are high lighted below.
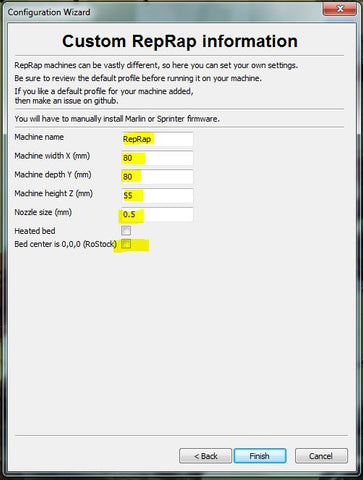
Change the high lighted areas to match the image below for a Griffin Pro XL. For a Pro Standard or Pro Mini, you can use the following settings for the X, Y, and Z areas. The nozzle size will remain the same 0.4 as in the image below for all sizes of printer.
Pro Mini: X: 170; Y: 170; Z:170
Pro Standard (also called Mid): X: 300; Y: 300; Z: 300

Once all of the settings for your printer have been put in, click "Finish" to continue with the setup.
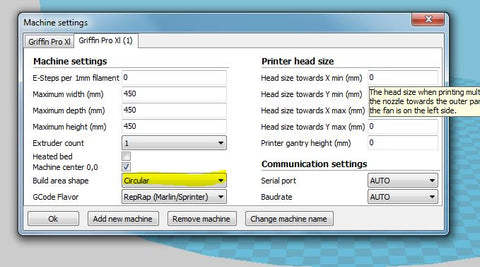
Step 5 - Machine Settings
Click the "Machine" drop down followed by "Machine Settings"

Next, we want to change the high lighted drop down that says "Square" to Circular. By doing this, we will change the shape of the build area to match the shape of the Griffin Pro 3D Printers.

Step 6 - Loading The Profile
In this step, we want to open the Griffin Pro profile for Cura. This contains all of the base information needed for getting started with your new 3D printer. This should be on the second Sdcard, be sure to use the proper profile for your printer (mini for mini, mid for mid, XL for XL).
First, select "File" and go to "Open Profile".

A new window will open asking you to navigate to the location that your Cura Profile was downloaded to. For this example, the profile was downloaded to the "Downloads" folder.

Once the profile has been selected, click the "Open" button and the profile will be loaded to Cura.
You are now all set!
Step 7 - Loading An Object Into Cura
For this step, we are going to download a calibration cube from YouMagine.
Once the file is downloaded, we want to click the "Load" icon in the upper left area of the build area screen in Cura.

Navigate to the area that the file was downloaded to and click "Open".

Now that the object has been loaded into Cura, we will see the progress bar automatically run as Cura slices the object. Some slices will take longer than others, this depends mainly on how large or complex the object is.

From here, you can insert an SD card into your computer and the floppy disk icon next to the load button will change into an SD card. Simply click save and you will see another progress bar appear as the file is loaded to the SD card.
A small bar will pop up at the bottom of the screen telling you that the saving process is complete. Click the Eject button to the right of the pop-up and the SD card is now safe to remove!
Move the SD card to the LCD screen of your Griffin Pro 3D printer and you will be ready to start printing!